
CHANGELOG
Here's our little big updates
See what's new added, changed, fixed, improved or updated in RevenueHero.


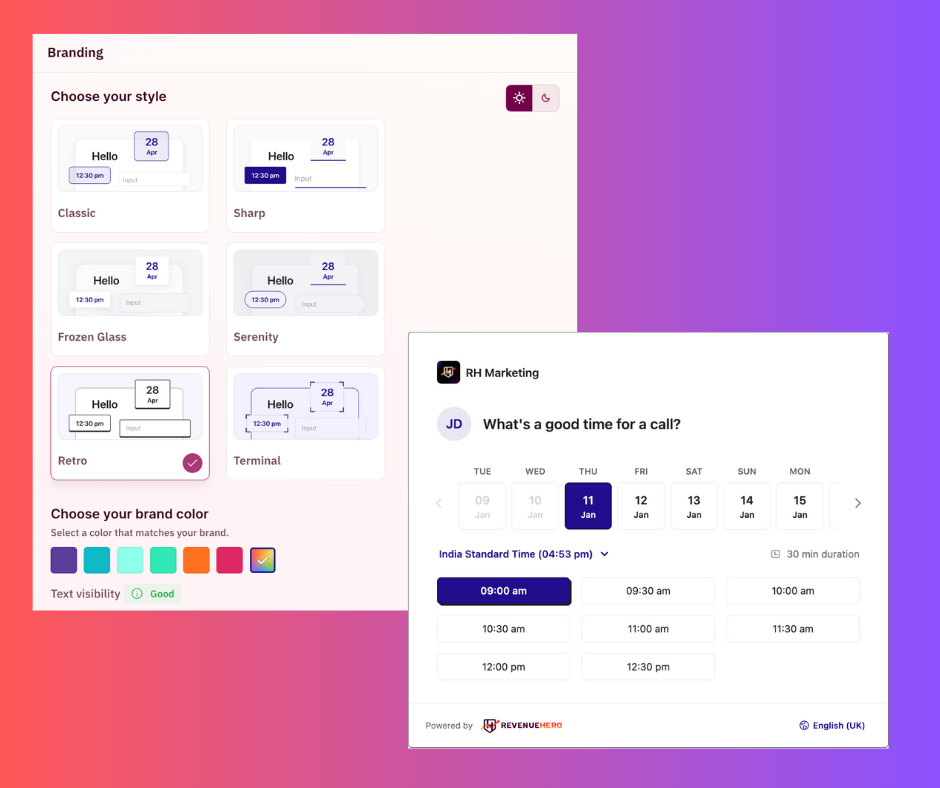
In the world of templates and look-alike booking pages, wouldn’t you want to stand out with a booking experience that looks and feels like an extension of your brand? We heard this from many of our customers and prospects and spent the last few weeks working on a major release - Themes. You can now customize the booking experience for your customers to reflect your brand across your website widget, personal meeting links, and more.
It can be customized and tailor-made to your brand’s style and design easily in a few clicks. No code is needed. Nor is a developer’s help. You can ensure that your customers get a unified and consistent brand experience across all touchpoints.
Let’s take a tour of Themes in RevenueHero, how it works, and how you can make the most of it.
- There are a total of 12 scheduler themes for you to choose from - 6 in light mode and 6 in dark mode.
- Each theme has a different confirmation page style and animation, give it a spin to see what works best for your brand.
- Choose your brand color with the help of the color picker which reflects on the scheduler.
- Mobile views of the scheduler have been completely revamped based on the new themes.
- The theme you choose adapts to poor color choices and also has adaptive backgrounds.
- Themes are not restrictive to just what’s on the UI. If you want to revamp the look of the entire scheduler completely, you can do that too. Just reach out to us via Slack and we’ll help you customize it as per your requirements.
You can find the detailed guide for Branding and Themes here.
That’s not all. We also have another big release that we rolled out this week.
Remove team members from RevenueHero
You might want to remove a member from your RevenueHero workspace. Regardless of the reason, we’ve now created a way for you to delete a team member easily. Only users with Manager or Admin permissions can remove a member.
How does it work
- Go to the Organization Settings page and select the Members tab.
- Hover your mouse over the user you’d like to remove and click on the trash icon.
- You’ll see a popup indicating what the consequences are.
- Select “Yes I understand”.
- You’ll now see a screen that shows all the rules/routers this user is part of.
- Here’s where you can configure who these meetings should get assigned to once the user is removed.
- After clearing all the dependencies, you’ll see a screen indicating the user is safe for deletion.
- To confirm, click “Delete”.
For a much more detailed version, check out our help article here.